Introduction
With a cloud hosting provider like Civo, you get a full implementation of an operating system, including administrator privileges. This means you can run any programs you want, develop using any tools you like and have full control over users, files and running services.
But with great power comes great responsibility, as a young Peter Parker was once told.
There are a number of ways malicious users will try to gain access to unsecured or vulnerable systems, and awareness of these ways means an ability to mitigate the risk of someone using your system for unauthorised purposes.
The catch-all term for various measures to enhance system security is hardening. This guide will give you the basics to make sure that your instance is hardened against the most common malicious attacks. I will be using a Ubuntu-based Linux (18.04) for my examples, but they are generically applicable for all UNIX variants with slight terminology differences.
Why worry?

This is a screenshot of the logs of one of my cloud instances where someone has tried to log in as the superuser.
Statistically, someone somewhere will attempt to hack your server if they can. Attackers can launch automated attacks over the internet, looking for easy ways in. Fortunately, there are easy ways you can secure services you are running. This guide will cover:
-
SSH Access Hardening
- User accounts
- Using a non-standard port
- Disable password access
- Disable
rootlogin over ssh
- Keeping System Software Up to Date
- Firewall Setup
- Automated Backups (in case the worst happens)
Prerequisites
You are probably reading this because you are looking to set up a Virtual Private Server.
If you are about to create a new Civo instance rather than harden an existing one, make sure you have an SSH key set up on your account. This guide will assume that you can log in to your server using SSH and a later step involves logging in with a key rather than a password, so it's a good idea to generate one now if you have not done so.
Hardening SSH Access
User Accounts
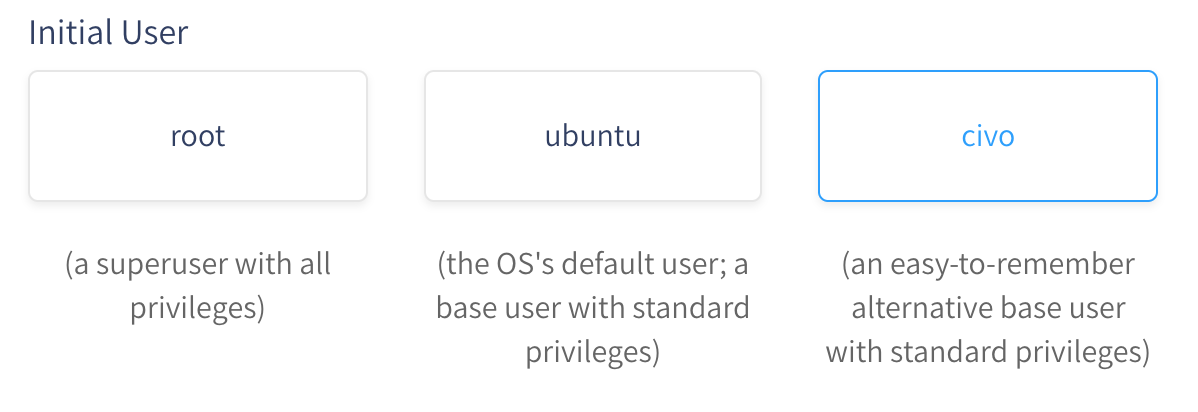
By default, Civo gives you the option to name your first user root, the OS name (such as ubuntu) or civo. The first is not recommended, as root has access to everything on a system - and we're going to prevent root logins in the next section for this very reason. Attackers will also often try the OS default username, so if you are using Civo, I would recommend the last option of creating a user account with the name civo when you set up your instance.
Disable Root Logins Over SSH
By default, every Unix-like system has a root account with full privileges to the system. This is a simple fix to prevent an unauthorised user logging in with superuser privileges right away. You will still be able to run a root level shell by using su or sudo once logged in.
The following steps assume you have created a user other than root that can log in to your instance. You can do this easily at instance creation by specifying a username. See the relevant Dashboard section in the screengrab below:

Once you have logged to your instance, you can disable remote root logins simply by editing /etc/ssh/sshd_config and editing the PermitRootLogin line. You will need to use administrator privileges (with sudo) to do this. An easy editor to use is nano which should be automatically installed:
$ sudo nano /etc/ssh/sshd_config
Once you're editing the file, find the line with PermitRootLogin and change the yes to no.
Then simply press Control + o to save, Enter to confirm the file name, and Control + x to exit.
Then restart your ssh service by running:
$ sudo systemctl restart ssh
This will prevent any subsequent attempt using root as a username. Crucially, to an attacker it will look like they're just getting the password wrong - they will be none the wiser.
Use a Non-Standard Port for SSH
The default port for SSH traffic is port 22. You can prevent a bunch of automated access attempts by changing the port at which you're listening for connections. As with disabling root logins, this step involves editing /etc/ssh/sshd_config. This time, you're looking for the line with Port 22. If yours looks like #Port 22 that's fine too. We will need to change the line to remove any # symbol and change the port to one of your choice. Let's say you want to use port 23456 you need to change the line to say
Port 23456
Then Control + o, Enter and Control +x to save the file.
Once you run:
$ sudo systemctl restart ssh
Your SSH server will begin to listen on the newly-specified port. In any new connection, you will need to specify this port to log in: $ ssh username@host-ip -p 23456 .
Checking a port is not already being used for a service
It's important to make sure your non-standard port number does not conflict with another service listening on the same port. You can easily check this using netstat -tulpn as follows:
$ sudo netstat -tulpn
Active Internet connections (only servers)
Proto Recv-Q Send-Q Local Address           Foreign Address         State       PID/Program name
tcp        0      0 127.0.0.53:53           0.0.0.0:*               LISTEN      791/systemd-resolve
tcp        0      0 0.0.0.0:23456            0.0.0.0:*               LISTEN      1538/sshd
tcp6       0      0 :::23456                 :::*                    LISTEN      1538/sshd
udp        0      0 127.0.0.53:53           0.0.0.0:*                           791/systemd-resolve
udp        0      0 0.0.0.0:68              0.0.0.0:*                           812/dhclient
udp        0      0 0.0.0.0:68              0.0.0.0:*                           700/dhclient
udp        0      0 0.0.0.0:68              0.0.0.0:*                           720/dhclient
In the above real-world example you can see that the current ports being used for services are 53, 23456 and 68. Port 22 is no longer used for SSH.
A note on version 1 of the SSH Protocol
As this guide is geared for Ubuntu 18.04 (and later), it will not cover disabling SSH v1, which has been removed from the current versions of SSH used by Ubuntu. Older versions of Linux operating systems may still support version 1, which is insecure as it does not support key authentication. We will cover making key authentication the default in the following section.
Disabling Password Access
In the Pre-Requisites section I mentioned needing an SSH Key. This section is where that comes in. What we are going to do is prevent anyone from logging in to your instance without having your SSH Key, which is inherently more secure than a password due to being far more complex.
Note: If you lose access to your SSH Key, you will lose access to your server with the exception of the web console on Civo.com
I'm going to assume you added your SSH Key to your instance at creation - here's a screenshot of the relevant part of the Civo Dashboard:

As you can see, you can select a random password for the default user, or use any of your stored SSH Keys. I am using my work computer for this guide, so I've named the active key accordingly. This means that I will be able to log in to any instance I create with the SSH Key credentials rather than typing in a password.
Next, we are going to disable access using a password over SSH. Our first step is to once again open /etc/ssh/sshd_config for editing.
You're going to need to find the line PasswordAuthentication and make sure it is set to say no.
Save the file, exit and reload sshd:
$ sudo systemctl restart ssh
Now, even if a user account may have a password configured for it, you will not be able to log in just by providing it.
System Software Updates
Software installed on your server gets periodic updates both for new features and, importantly for this guide, fixes for security issues. It is a good idea to make sure these updates are a regular part of your routine. The main commands for software updates are as follows:
$ sudo apt-get update
$ sudo apt-get upgrade -y
The first command checks what software packages can be updated, and the second one upgrades any that you have installed, with the -y switch automatically accepting each update saving you having to do it manually.
Now, you can automate the update of security features using scheduling such as cron, but Ubuntu on Civo includes the unattended-upgrades package which does just that automatically.
Firewall Setup
All Civo instances configured with default settings initially have no firewall control. This can easily be changed using the web dashboard to configure firewalls. Adding a firewall to an instance will close all ports except the ones you define, which is nice and secure. In the following example we are going to create a new Firewall with the only allowed port being our defined SSH port:
First, navigate to the Firewalls section of the web dashboard.
Go ahead and click on Create firewall and give it a name such as ssh-only.
Click on the book icon to access the firewall rules.
Add the SSH port you've configured for your server in the previous section to the start and end ports, and give the rule an identifying name (such as custom-ssh):

Press the plus button under Action to add the rule.
Now to apply this firewall to our instance, navigate back to the Instances panel and click on your active instance.
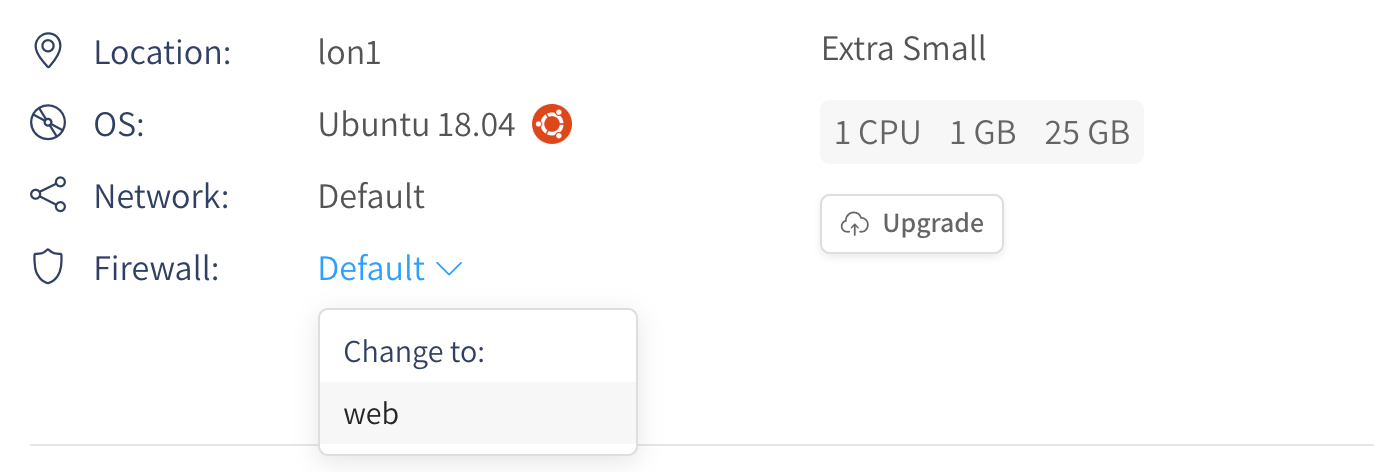
Once you are looking at the instance information, you will see a Firewall drop-down. Select your new firewall rule from the list under "Change to":

That's it! The instance will now use the firewall rules configured by you, meaning it will only permit traffic on the port(s) you have defined.
Automated Backups
All of the above measures make it harder for a malicious user to gain access to your system, but you should still be aware that it may be possible. You may end up losing the data on your server in an attack, which is where automated backups come in.
Civo provides a handy way to take full backup images, called snapshots, of the state of your server's disk at a given point. You can take a snapshot at any given time manually using the web control panel or command-line tool, or you can set up an automated process that generates snapshots at intervals of your choice.
If at any time you end up losing access to your data or your user accounts on the server, you can restore an earlier snapshot. Remember that you will still need to patch the vulnerability that led to the breach if that is what caused the loss.
Conclusion
WIth a few simple steps that can easily be combined you can take basic precautions to prevent unauthorised access to your private servers. Aside from hardening remote access through SSH, you have learned of the ways Civo allows you to manage firewalls and backups through your account.
Though no system is fully impenetrable, by taking the above steps you will make it that much harder for an opportunistic attacker to succeed in gaining access.
Next Steps and Further Reading
- If you do not want to back up the full server image and would rather do incremental backups, Alex Ellis wrote a guide on using Restic and MinIO to do just that.
- Follow us on Twitter!


