GitLab and Kubernetes: The Winning Combination
Gitlab has Kubernetes integration. This post is about getting started with that, rather than covering everything in massive detail. Maybe there’ll be a part two. If you'd like to see one, or have ideas or questions please let me know in the Civo community Slack (where I'm Mac), or tweet @lsdmacza.
It’s a good idea to first read the “about Kubernetes” page at Gitlab.com, and the other source I used heavily for this was Bitnami’s CI/CD pipeline tutorial. I had looked through a couple of other tutorials, but they were based on older versions of Gitlab before the Kubernetes integration had been polished to its current state, and so they were a bit dated. Nevertheless, there are some great demonstrations of the power of .gitlab-ci.yml which I am not covering in this post if you want to read further.
Prerequisites to unlocking continuous deployment on Civo
To unable continuous deployment on Civo you will need to have:
- A gitlab account. (Can be at Gitlab.com, or a self-hosted Gitlab platform). I used my Gitlab.com account.
- A domain name to which you can add/remove DNS entries. Don’t have one? Get a free domain at Freenom.
- An existing Kubernetes cluster, on which you have administrator privileges. Get yours at Civo for free whilst the Beta is running.
- I created a Kubernetes cluster at Civo, without any default ingress controller, because once I add the cluster as a “managed” cluster in Gitlab, I could do all of that from there. If you want to follow along with this guide, you will need to remove the default ingress controller before you launch the cluster. You can do that using the Civo CLI like so:
Create a single-node Kubernetes cluster
civo k3s create gitlab3 -s g3.k3s.large –nodes 1 -r Traefik --region NYC1
The above command creates a single-node Kubernetes cluster called
gitlab3, with node sizeg3.k3s.large, in the regionNYC1while removing the defaulttraefikingress controller using the-rswitch. You will need to have added your API Key to Civo CLI according to the instructions.
Create a service account for Gitlab
I followed the excellent documentation from Gitlab, and made sure to capture the external Kubernetes API URL and the cluster certificate, and then created a service account for Gitlab to use, to which I gave cluster-admin privileges. (Note that this is a bad idea if you are deploying to production. For the purposes of this demo it's fine, though).
Then in Gitlab, I created a new project, and in my project I navigated to Operations –> Kubernetes, and used the “add existing cluster” entry:
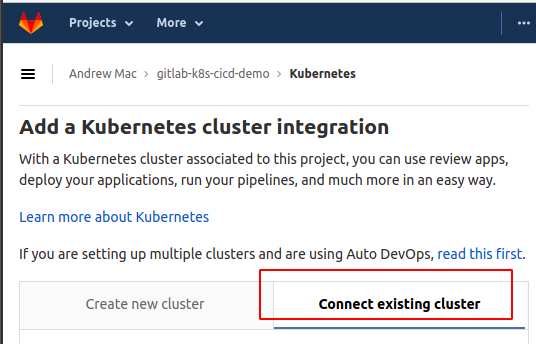
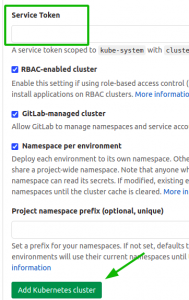
I followed the prompts, and the obtained a “service token” like this:
- Create a yaml file containing service account definition and clusterrolebinding:
- Apply the configuration file you created to your cluster:
- Added the service token on the GitLab site:
- And then supplied the (optional) custom prefix to be used when creating namespaces.
apiVersion: v1
kind: ServiceAccount
metadata:
name: gitlab
namespace: kube-system
---
apiVersion: rbac.authorization.k8s.io/v1beta1
kind: ClusterRoleBinding
metadata:
name: gitlab-admin
roleRef:
apiGroup: rbac.authorization.k8s.io
kind: ClusterRole
name: cluster-admin
subjects:
- kind: ServiceAccount
name: gitlab
namespace: kube-system
kubectl apply -f privs-gitlab-ci.yaml
When the service account is created, Kubernetes will create a token, stored as a secret. I found mine by running
kubectl get secret -n kube-system | grep gitlab
And then ran a command like this to obtain the “decoded” token string:
kubectl -n kube-system get secret gitlab-token-XXYYZZ -o jsonpath="{\['data'\]\['token'\]}" | base64 --decode**
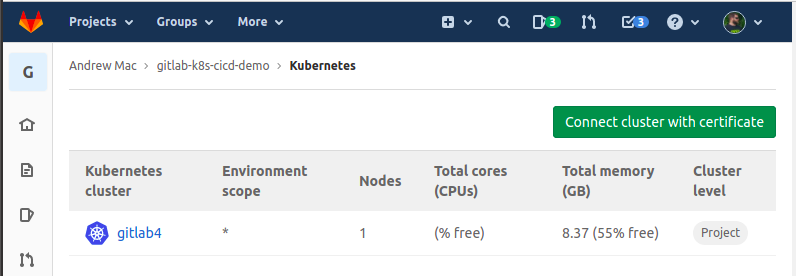
Once that was done, there was a cluster reflecting; like this:
Adding Gitlab Runner in my Kubernetes cluster
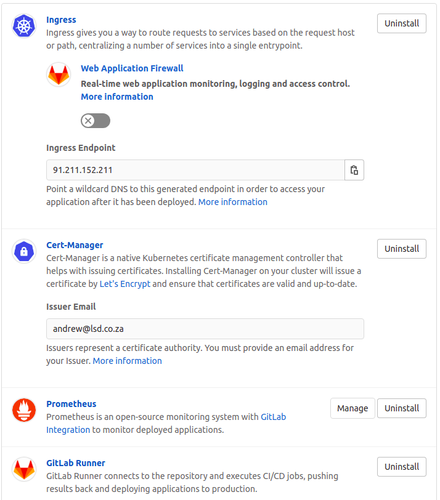
There were a few more steps to do after that. So I selected the cluster, and added some Applications to it, so that Gitlab could show me metrics, and of course, so that there would be a Gitlab Runner deployed to actually handle the builds and deployments.
I installed the Nginx Ingress, Cert-Manager, Prometheus and the Gitlab Runner. There were several other applications, but I didn’t feel it was necessary to install a whole elastic stack. However the ability to do so could be very useful.
As an aside, dealing with which monitoring stack a platform wants installed is a bit of a pain. e.g Gitlab offers to deploy an Elastic Stack, and maybe Fluentd. Those will be deployed into a namespace called “gitlab-managed-apps”. But if you happen to be doing this on a RKE/Rancher-managed cluster, Rancher too has an observability toolset. And then throw in Elastic Cloud Enterprise for APM or Dynatrace or AppDynamics and what used to be a performant cluster can pretty quickly turn to sticky molasses. This bears further thought about what goes where. (Your thoughts and feedback are welcomed for that too).
So, back to the task at hand. I now had a Gitlab project with a Kubernetes cluster integrated.
$ kubectl -n gitlab-managed-apps get pods --template \
'{{range .items}}{{.metadata.name}}{{"\\n"}}{{end}}'

ingress-nginx-ingress-default-backend-77d64745d9-5nq5r
svclb-ingress-nginx-ingress-controller-7nw8m
ingress-nginx-ingress-controller-6cbf95f5d4-bkpqp
certmanager-cainjector-5995b97d7d-rsj6t
certmanager-cert-manager-685dbd6f84-8v227
certmanager-cert-manager-webhook-797b6b85bc-mbwzf
prometheus-kube-state-metrics-7596c4bc64-m76rf
prometheus-prometheus-server-597dc9d9c7-6q4lq
runner-gitlab-runner-544f55698f-rv2bf
The next step was to disable shared runners, so that I could be sure that pipelines and tasks were only going to execute in my shiny new Kubernetes cluster.
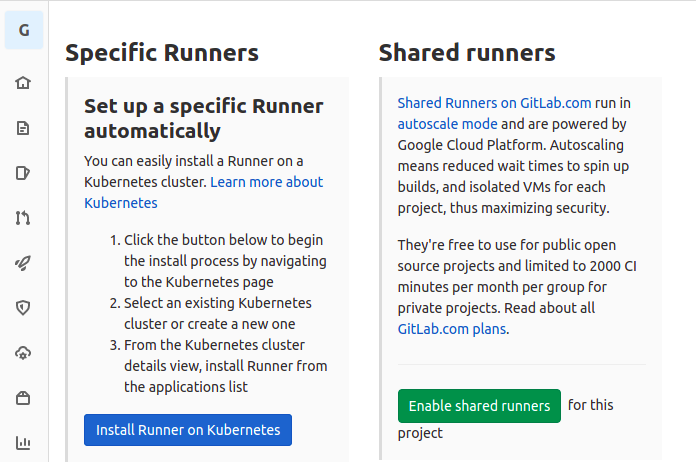
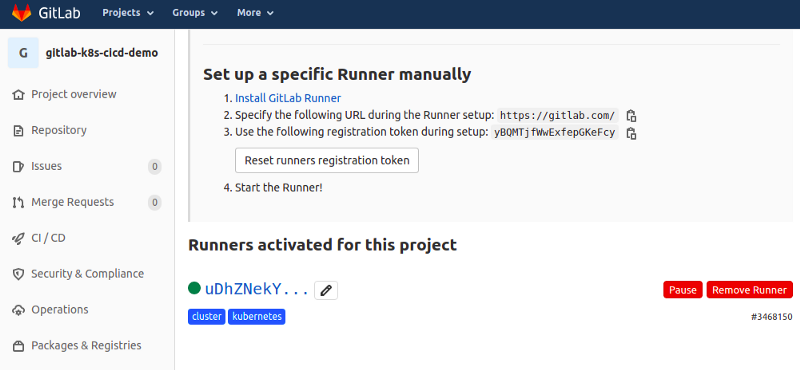
After that, all I had was my own Gitlab Runner in my Kubernetes cluster.
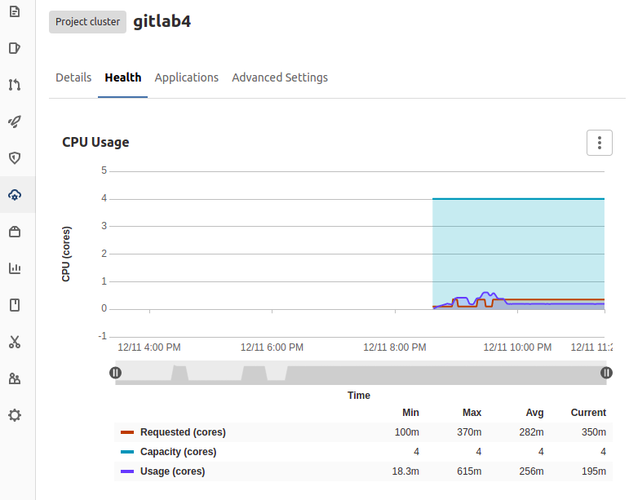
And after some time, Gitlab began to show me some stats from my Kubernetes cluster too, under the Health tab.
Hmm, we’ve covered ingredients 1, 3 & 4 in the list at the start of this guide. What about the second ingredient: DNS?
Configure your DNS/domain name records
I entered gitlabci.trythis.ga as the Base domain in the Details tab of my new Kubernetes cluster. To use that, though, I had to make sure I had DNS pointing to my Kubernetes Ingress controller(s). In my case there was only one IP address I needed, and I had recorded it earlier when obtaining the Kubernetes API URL by running:
$ civo kubernetes show gitlab4

          ID : 55c64b1b-8fbf-4105-8f7b-15e6acd11cef
        Name : gitlab4
       Nodes : 1
        Size : g2.large
      Status : ACTIVE
     Version : 1.18.6+k3s1
API Endpoint : https://91.211.152.211:6443
   Master IP : 91.211.152.211
DNS A record : 55c64b1b-8fbf-4105-8f7b-15e6acd11cef.k8s.civo.com
And then I created a couple of DNS entries so that anything in the .gitlabci.trythis.ga domain would be directed to 91.211.152.211. (If you’re trying this, your IP will be different, and if you’re using GKE or EKS rather than Civo you may need to use a different approach to cluster ingress):
$ civo domain record add trythis.ga -n gitlabci -e A -v \
91.211.152.211 -t 120

$ civo domain record add trythis.ga -n \*.gitlabci -e A -v \
91.211.152.211 -t 120

$ civo domain record add trythis.ga -n oncivo -e A -v \
91.211.152.211 -t 120

$ civo domain record add trythis.ga -n \*.oncivo -e A -v \
91.211.152.211 -t 120
Enable Auto DevOps and start deploying
Next I needed to enable Auto DevOps and push some code into my project. Auto DevOps tries to “do the right thing” with your application code and if it finds a Dockerfile or a matching build-pack. The list of scans and checks that are done by default against the code, without any additional configuration required, is impressive to say the least.
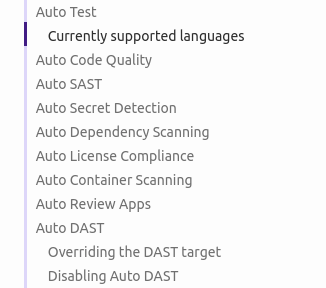
If you want more fine-grained control their Gitlab CI tooling, controlled via a .gitlab-ci.yml file is pretty amazing!
I added 3 files to my local git repo:
package.json:
{
  "name": "simple-node-app",
  "version": "1.0.0",
  "description": "Node.js on Docker",
  "main": "server.js",
  "scripts": {
    "start": "node server.js"
  },
  "dependencies": {
    "express": "^4.13"
  }
}
server.js:
'use strict';

const express = require('express');

// Constants
const PORT = process.env.PORT || 3000;

// App
const app = express();
app.get('/', function (req, res) {
  res.send('Hello world\\nHello Mac\\n');
});

app.listen(PORT);
console.log('Running on [http://localhost:'](http://localhost:%27) \+ PORT);
Dockerfile:
FROM bitnami/node:9 as builder
ENV NODE_ENV="production"

# Copy app's source code to the /app directory
COPY . /app

# The application's directory will be the working directory
WORKDIR /app

# Install Node.js dependencies defined in '/app/packages.json'
RUN npm install

FROM bitnami/node:9-prod
ENV NODE_ENV="production"
COPY --from=builder /app /app
WORKDIR /app
ENV PORT 5000
EXPOSE 5000

# Start the application
CMD \["npm", "start"\]
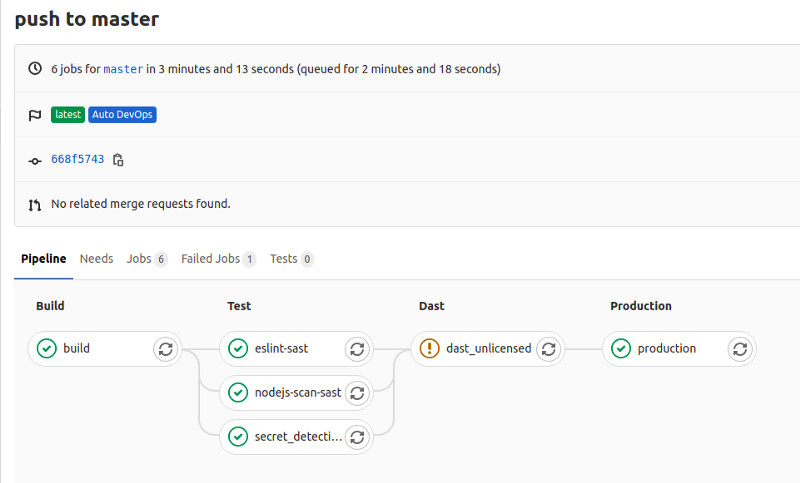
I committed my freshly-minted application code, and as soon as I had finished uploading my changes with git push , Gitlab began its magic. Below is a screenshot of the pipeline that Gitlab used. With zero input from me in creating it:
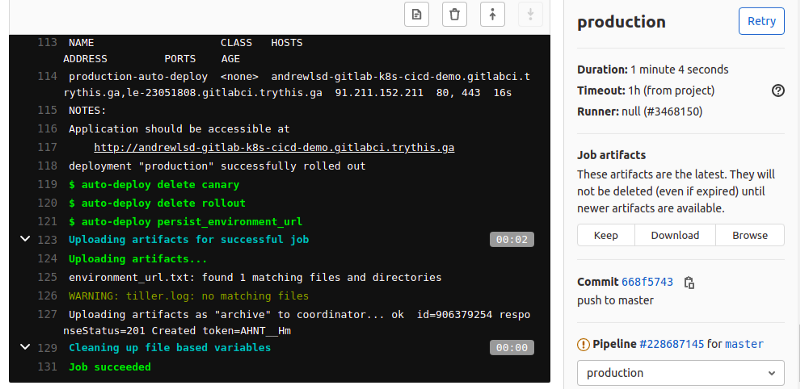
And below, in the output of the job that formed the final step of the pipeline, you can see the URL at which my newly deployed app was available.
The app itself was just a tiny “hello world” Javascript app, so it didn’t look amazing, but it was definitely published and running. With the connection nicely secured with a LetsEncrypt certificate:

If you made it this far, then I’d like to thank you for reading. I’m sure there is a ton more that can be said about this topic, and there are also a lot of other posts that cover different aspects of Gitlab + Kubernetes. If you have any suggestions, questions or comments, feel free to post them in the community Slack or via Twitter - @lsdmacza and @civocloud.


